Adding Your Company Logo to Zoom Meetings

At Lform, we prefer to use natural backgrounds instead of virtual backgrounds, but we do want consistent branding across all employees. This is not only more professional, but it also makes clear which attendees are on the Lform team, particularly in larger meetings.
Zoom does not have an easy way to achieve this, however. There are many guides, but none has provided the end result that we wanted: a small Lform logo in the bottom right corner of the screen for each person, with minimal configuration or work-arounds.
Luckily, this can be achieved by leveraging Zoom’s “Video Filters” functionality. There are three parts to implementing a corner logo: First we must create the logo image that will be uploaded to Zoom, then we must update the Zoom settings to add that image to the filter library, and finally, each person needs to activate the filter so the logo shows up in their Zoom when they join meetings.
Creating the Corner Logo Image
- Using an image editing program such as Photoshop, create a new 1920×1080 image with no background. That image size matches the resolution of HD video. The background must be transparent, or the filter will not allow your video to show through.
- NOTE: If you are not using HD-formatted video, you will need to create the image at the resolution of your camera. This can be identified by checking the video resolution of your webcam. The vast majority of webcams today are HD by default.
- Place your organization’s logo in the corner of the image where you wish it to appear. You’ll need to size it appropriately—not so large that it obstructs the video area, but not so small that it can’t be read. For us, sizing our logo to 150×200 pixels is the perfect balance of visibility without being intrusive.
- Be sure to offset the logo by 25 to 30 pixels from the edge of the image so it does not appear cut off or as though it’s there by mistake.
- You may want to add a small drop-shadow or outline so the logo does not blend into your video background. You may need to play around with this a little to see what works best. We recommend saving the file in PSD format so the layers can be manipulated, just in case you want to tweak the logo’s size, the shadow/outline, or the offset from the edges once you see it in Zoom.
- Lastly—this part is key—you need to horizontally flip the image so it appears mirrored backward. This is because Zoom shows everyone a mirrored version of the video feed by default, so people appear as they would in real life. If you wish, you can create both a mirrored and non-mirrored version. That way your users can select either one, just in case they don’t have mirroring enabled. This is discussed further below.
- Save the resulting image as a PNG with transparency enabled.
Uploading the Corner Logo Image to Zoom
- Login to the Zoom web interface to manage your account settings (https://zoom.us/account/setting). As of this writing, you cannot add custom filters within the Zoom interface.
- NOTE: In order to add new video filters, you need to be an admin of the main Zoom account that manages the team’s individual accounts.
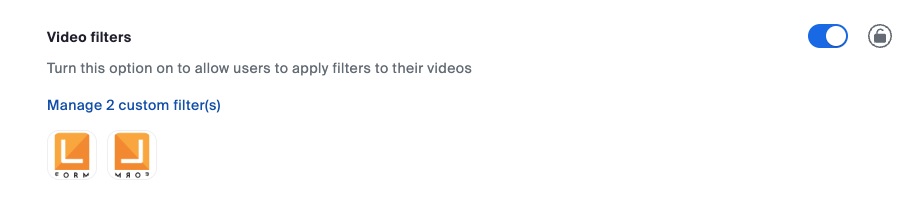
- Scroll down to “Video Filters.” You may need to search for this phrase, as the Zoom settings pages are a bit overwhelming and long.
- Make sure the “Video Filters” option is turned on.
- Click the “Manage Custom Filters” link. This will open a pop-up where files can be uploaded.
- Drag and drop your image in or browse to it after selecting “Choose Files.”
- If you created a mirrored and non-mirrored version, upload both.
Applying the Corner Logo to Your Zoom Settings
- You may need to quit Zoom at this point and restart it in order to be sure Zoom displays the new filters.
- In Zoom, go to “Settings,” select “Backgrounds & Effects,” then click on the “Video Filters” tab.
- The new corner image should appear in the list of filters. When you click it, it will appear backward on your screen, but this is correct: For everyone else, it will display correctly.
- NOTE: If you do not have “Mirror my video” (which is enabled by default) turned on, you will need to upload the non-mirrored version of your corner logo. Simply skip the step where you flipped the image.
- Before you leave the “Video Filters” interface, click the “Apply to all future meetings” option so it appears by default on all your meetings.
- Exit the settings. You’ll have a fully working branded logo in your Zoom meetings from now on!